This is Part Two to my previous post on the 15th century Venetian-Turkish coat and how it compares to actual Ottoman Turkish coats of the same time period. In this post I get into the making of both styles of coats.
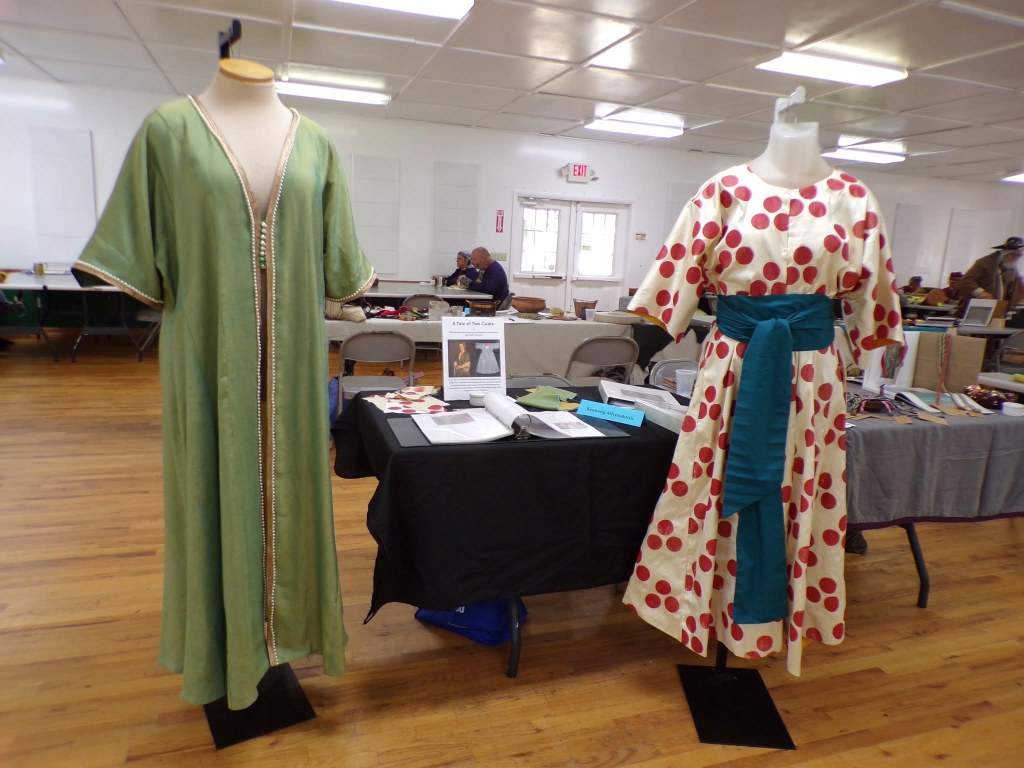
Making the Coats : The Turkish-Venetian

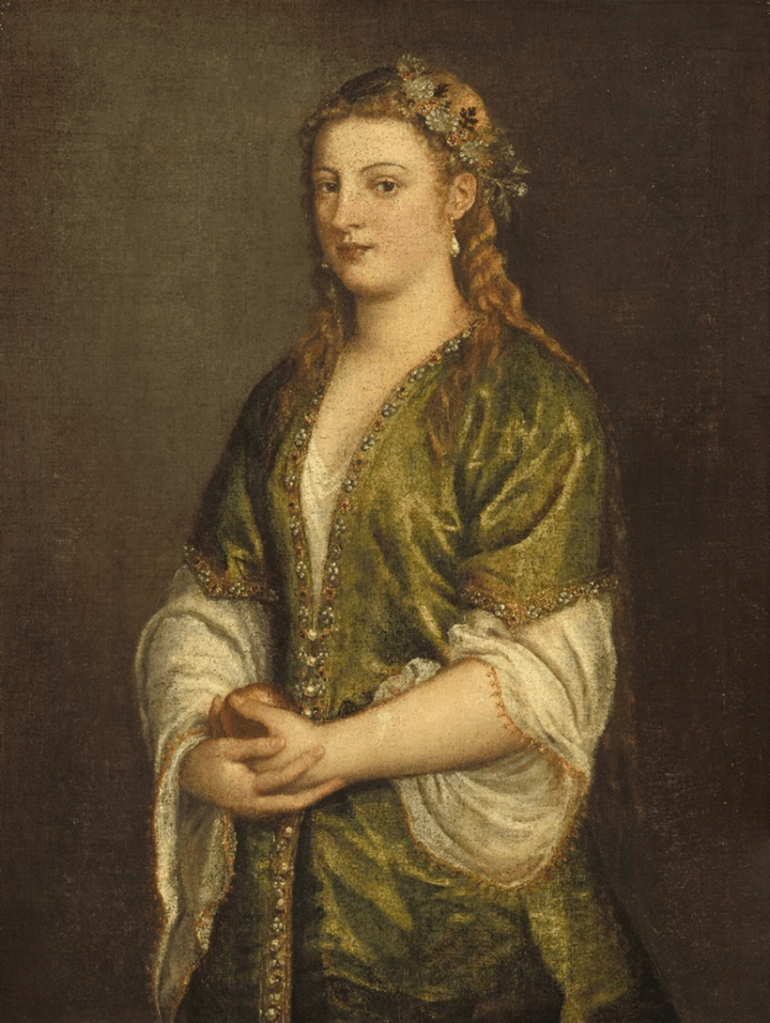
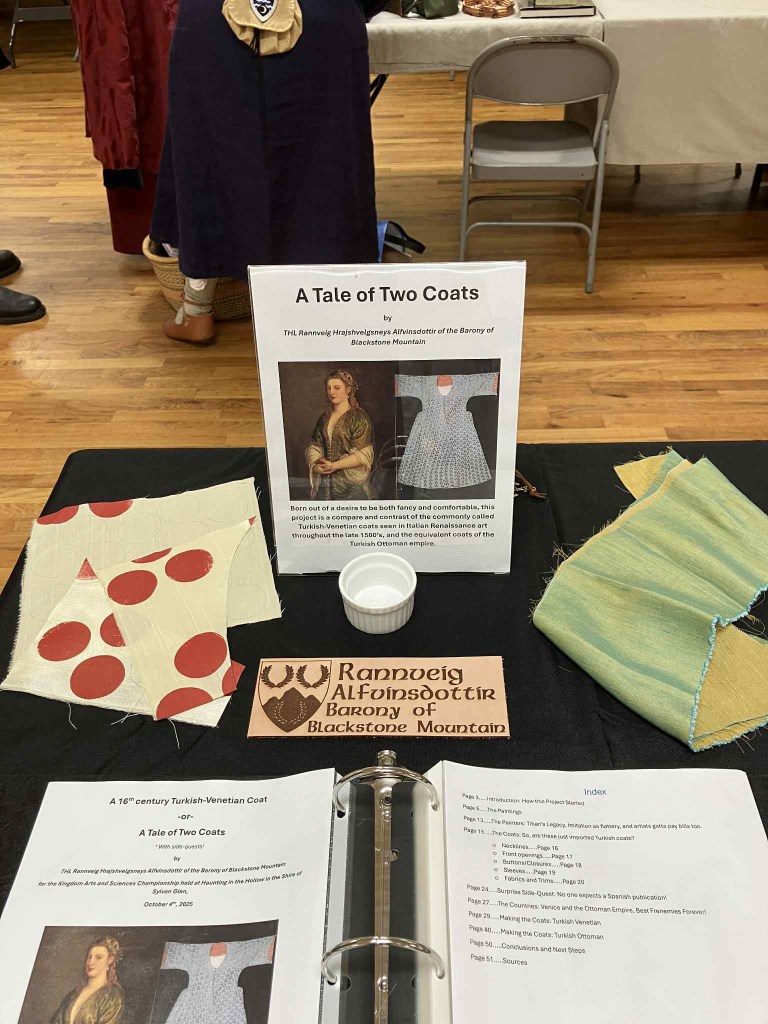
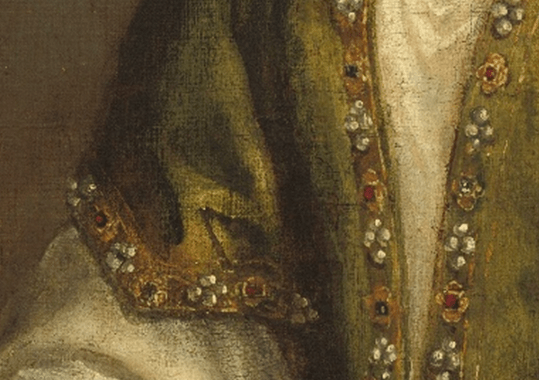
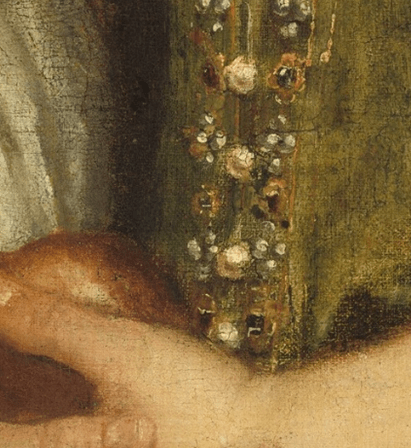
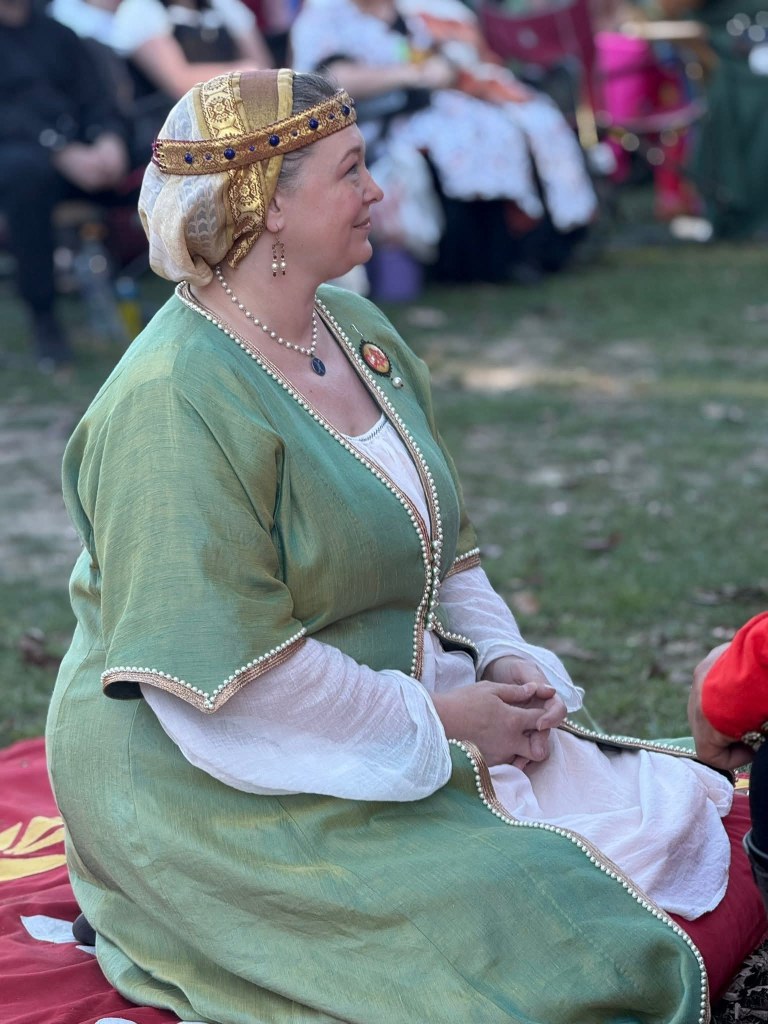
The above painting is the primary inspiration for my Turkish Venetian coat.
As a test run of the Turkish Venetian coat, I decided to make a wearable mock-up from some second-hand bed curtains that had been gifted me.
I completed this first coat in about a week, using whatever trim and findings I happened to have on hand. Then I took it for a test wear to War Practice, worn with the big voluminous chemise I usually pair my German outfit.
(I did attempt a quick and dirty Italian chemise, but after sewing the semi sheer fabric wrong ways together TWICE, creating the dreaded infinity-loop chemise, it was sent to time out.)
I loved my new fancy coat!
I can best describe it as Gleefully Comfortable!
***eventually there will be a picture of me in said mock-up here. ***
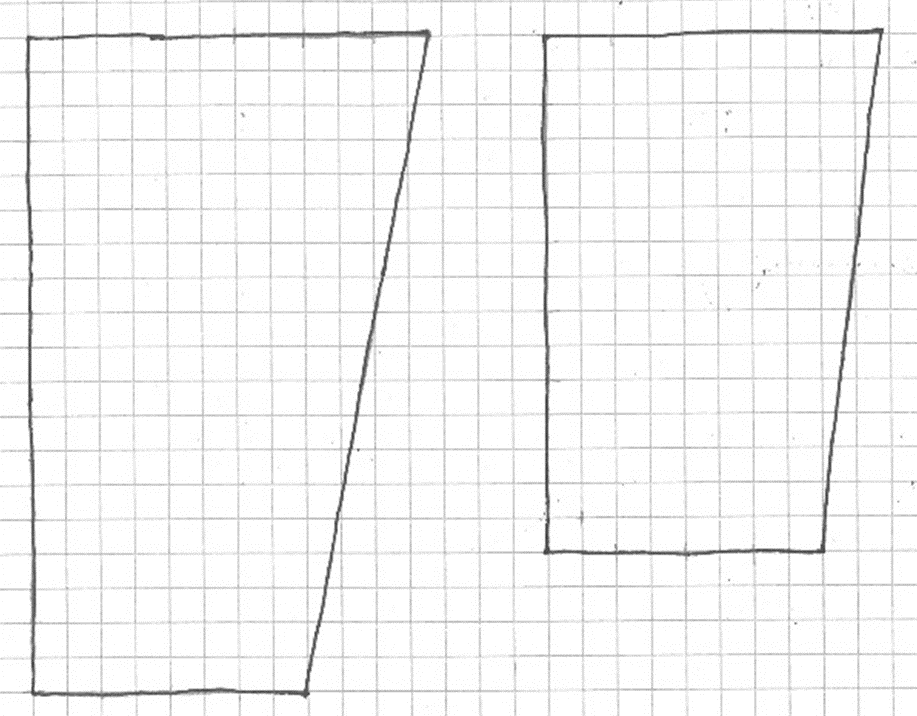
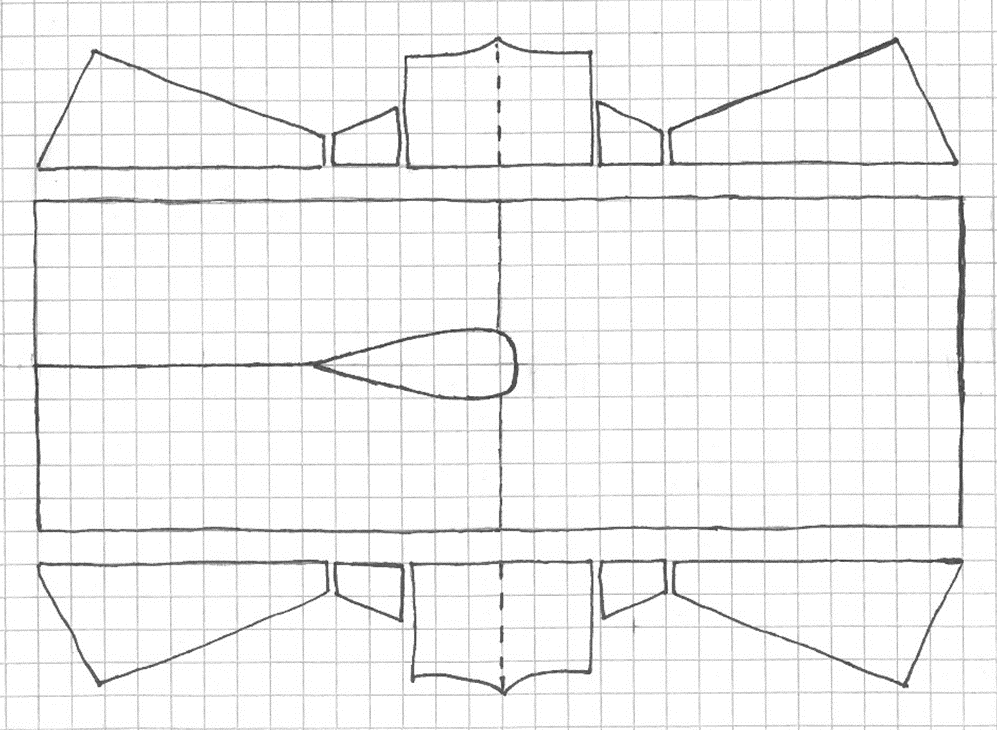
The Pattern
I chose to draft my pattern based on HL Aenor de Pessacs method shared in her fantastic Turkish Italian Gowns Sew-Along Class pdf.
She uses a rectangular method that was remarkably like what I had started sketching out on my own, and I am a huge fan of not re-doing math if someone else has already done it for me.

There were a few fit issues I wanted to tweak from my mock-up. I wasn’t thrilled with where the waist ended up as it felt too low for me, and I personally would prefer a more shaped back.
I shortened the upper side gores by about two inches to bring the waist higher.
I spent several days debating splitting the back panel into two with a shaped center seam. However, I decided not to.
None of the Turkish Ottoman coats I looked at appeared to have a back center seam or shaping that I could see. Since those garments are the closest reference,I have to base the back of the Venetian Turkish coat off of, that is what I am going to go with.
After wearing this coat for a bit, I may decide to make my next one differently or possibly alter this one.
The Fabric
War Practice cemented my desire to make this style my whole personality going forward (for at least a while), and I immediately began shopping for an iridescent silk taffeta so I could start on my “real” coat.
Alas, silk is pricey and my wallet is cheap.
However, I did find a cool iridescent faux silk on clearance in a color that I loved, so I put real silk on the back burner and went with the affordable option for this round.
I did have a bit of a hiccup when, after some internal debate, I decided to pre-wash my faux silk. This left the fabric significantly softer and far more drapey than it was before.
Apparently, my bargain fabric had been about 20% starch and sizing.
This caused me some stress, as I had envisioned a crisp fabric for this coat. However, after stopping to have a cup of coffee and contemplating life, the universe, and my inspiration image, I decided the added drape wasn’t awful, and it would feel lovely to wear.
Construction
I did not line this coat, as I love the contrasting gold color of the wrong side of the fabric.
Instead, I went with a wide linen facing to finish the edges of the neckline, center front, and sleeve edges. Similar edge treatments are seen in the extant Turkish coats, and my hope is that the facing will also help support the hefty embellished trim that goes on the edges of the coat.
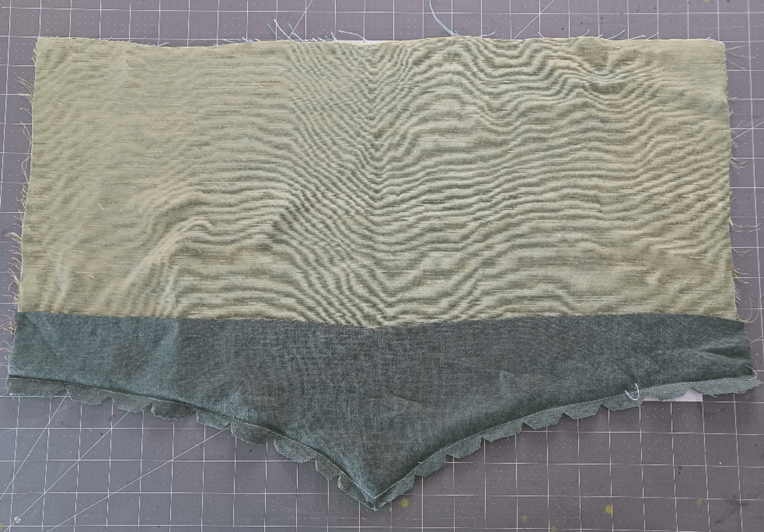
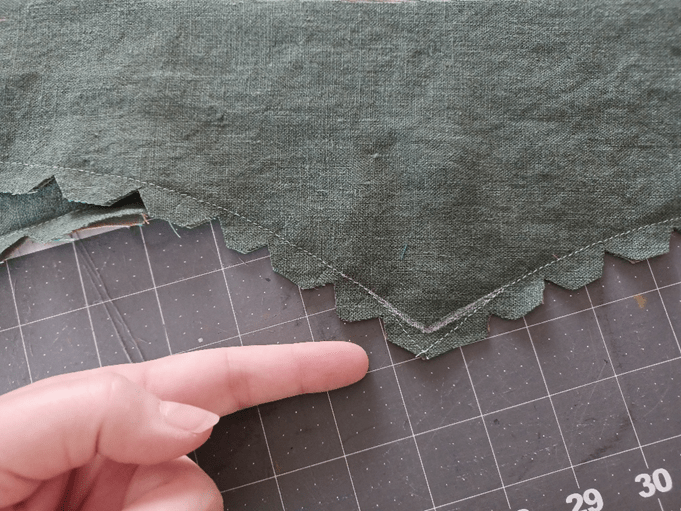
I hand whip-stitched the facings down, doing my best to keep the stitches small and invisible on the outside of the garment.
Overall, I am a little disappointed in how the edge of the whip-stitched facings have created a noticeable ridge on the outside of the garment that you do not see in any of the paintings.
In future coats I may end up doing some sort of lining to try and prevent that.
The rest of the coat is machine sewn, with the seams finished with a serger to prevent fraying.
Trim
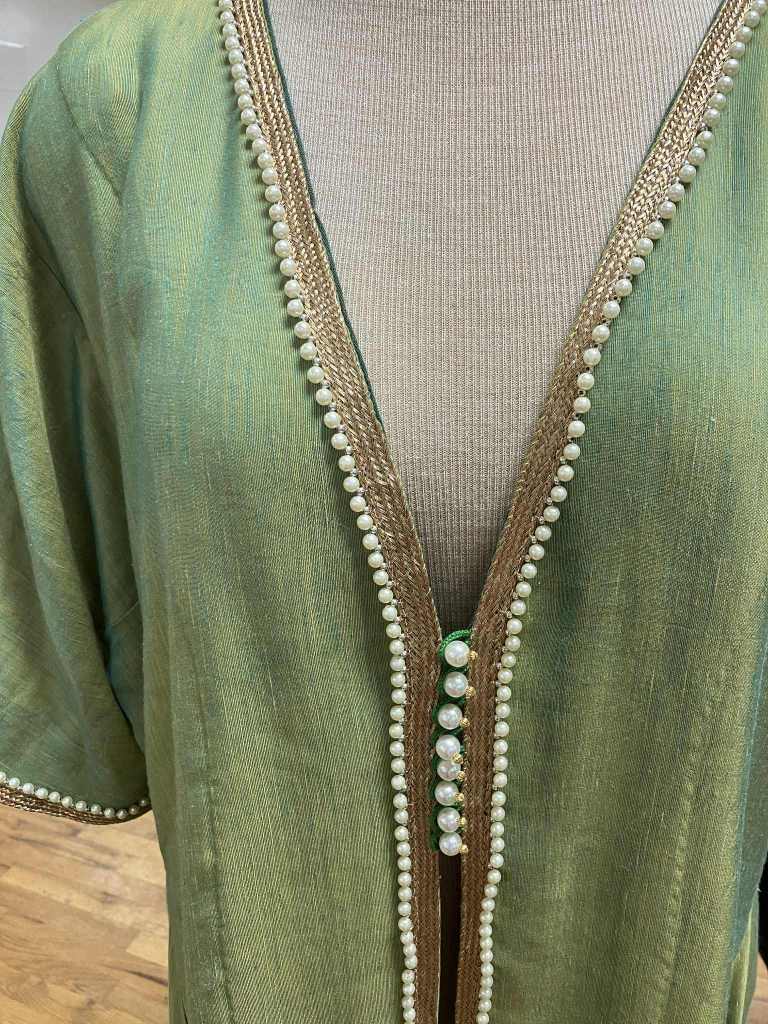
For the trim, I used some impressive woven gold trim featuring pearl and silver beading along one edge.
I found it on Etsy from a shop in India and I love how substantial it is, while still being relatively easy to shape around curves.
Part of me does want to go in and add additional beading and jewels along the flat gold area of the trim to make it more reminiscent of what is seen in the art.
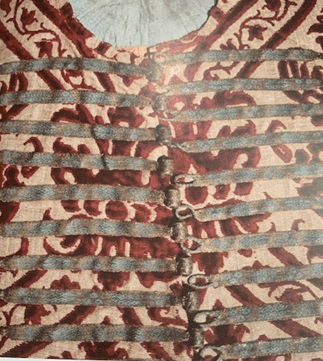
Buttons and Loops
For the buttons I made my own little pearl buttons.
They are simply a fluted gold bead and a large pearl bead slid onto a gold jewelry making headpin.
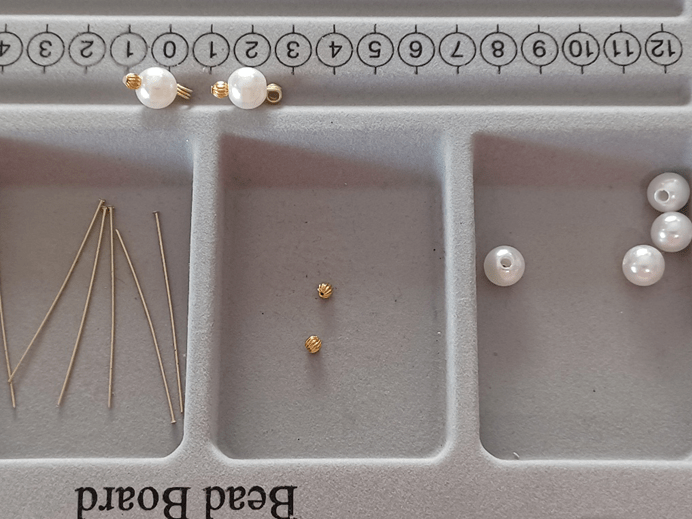
Then the extra length of the wire pin is curled around a pair of round nose jewelers pilers to create a loop to sew it onto the coat with.
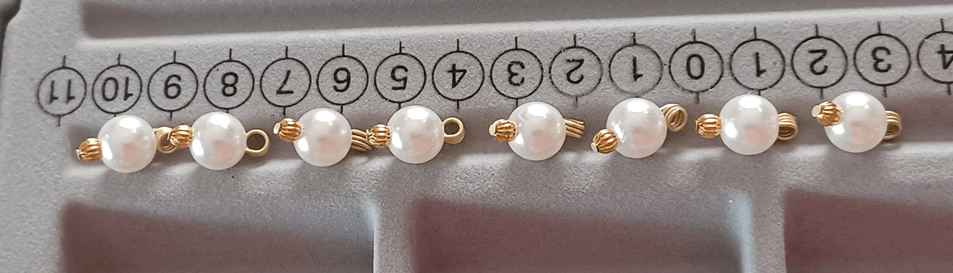
The buttons on my inspiration painting appear to be plain pearls, but I could not resist adding the extra gold beads.
I am really pleased with how these little buttons turned out, and can see myself using this same method on future projects.
For the loops I attempted to make some narrow cording out of the same fabric as the coat.
However, what I managed to make was just too wide and too stiff to work well with my dainty pearl buttons.
I ended up using my lucet to whip up a narrow green cord out of some cotton crochet thread I had in my stash. I am much happier with it than I would have been trying to force the original cording to work.
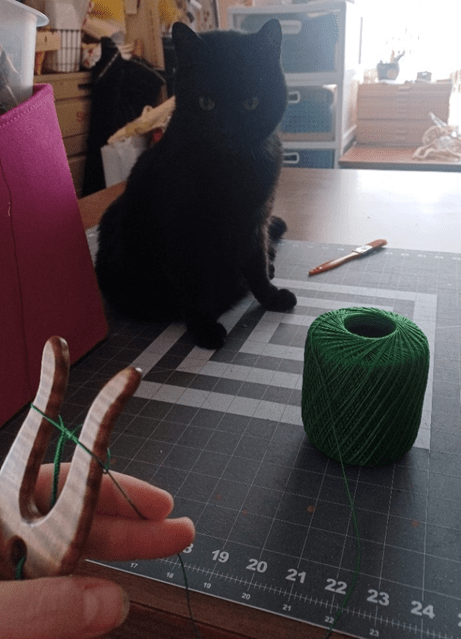
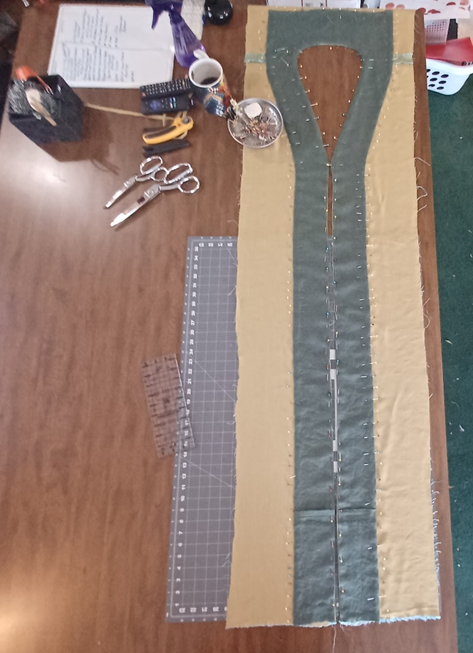
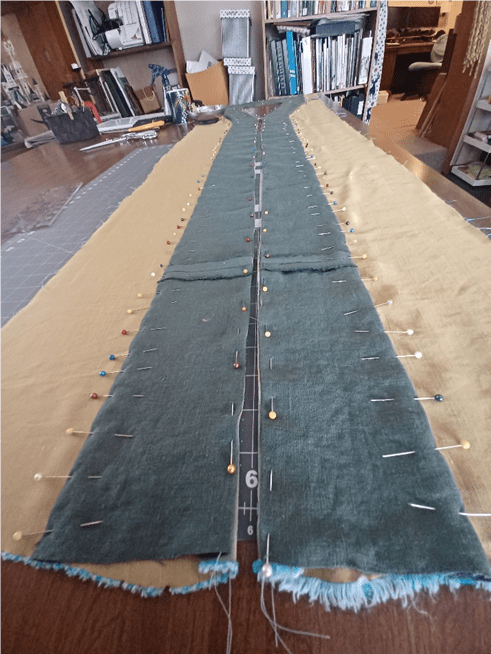
The loops are sandwiched between the coat and the trim. I hand stitched down the loops first, then sewed the trim in place, letting those stitches also catch the cords of the loops to fully secure them in place.
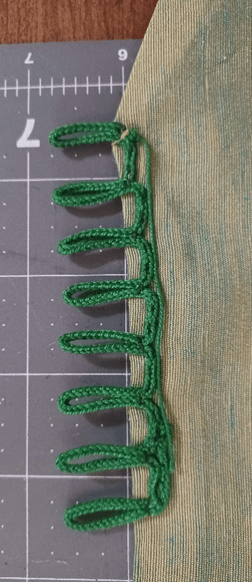
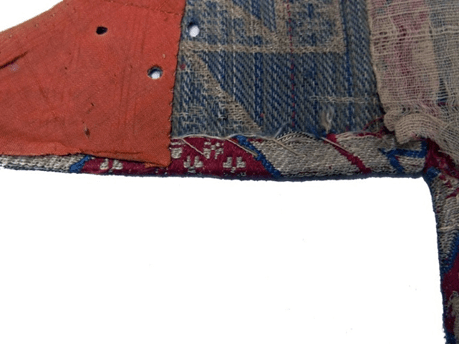
Above image shows how the button loops were attached before adding the decorative trim, and the image below is after adding all the trim and the buttons.

It has been suggested that these loops would more likely be thread-worked loops, and that if I am going to use cording I should consider finger-looped cord.
While I do not disagree, to some extent, I made these choices as personal accommodations for my own wants and needs.
At this point in construction my wrist and hands were starting to act up from all the hand sewing I had been doing across a number of projects, and I knew I was going to need to be in my wrist braces soon. I just didn’t feel like using up my dexterity points on button loops.
As for lucet cording over finger loop (or other types of cord), I just don’t enjoy finger-looping cord. However I friggin love making cord with my lucet…it’s a fun thing to do for me. So given the option, I’m going to whip up something on my lucet when I need a cord.
Making the Coats: The Turkish Ottoman
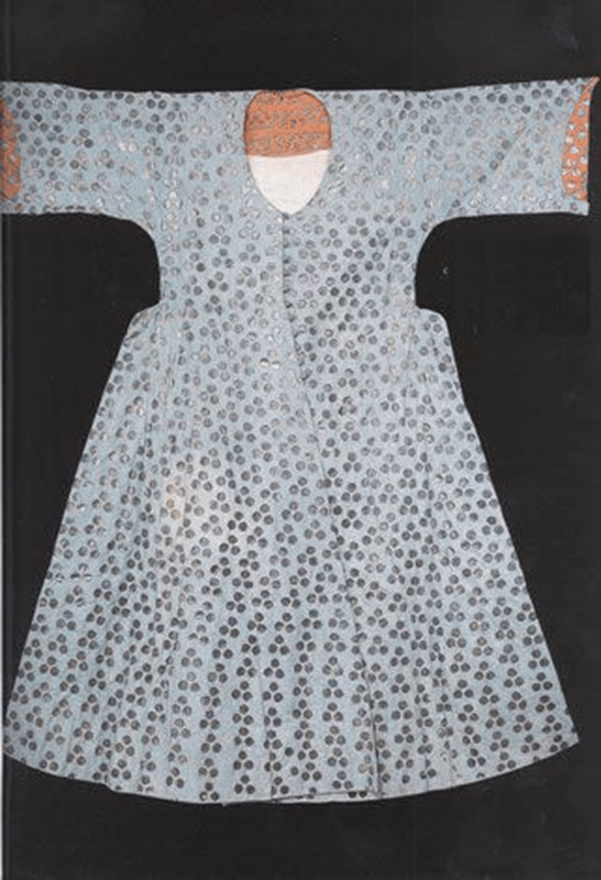
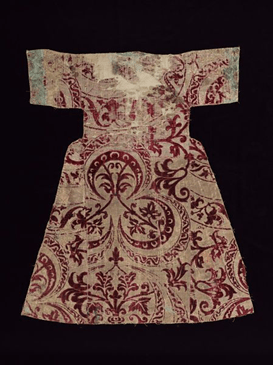
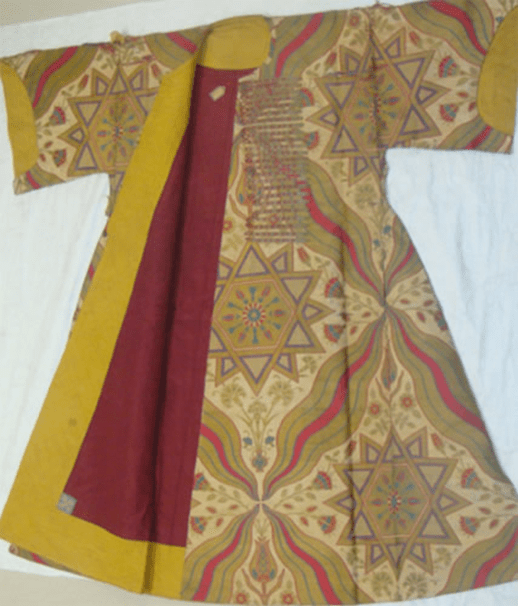
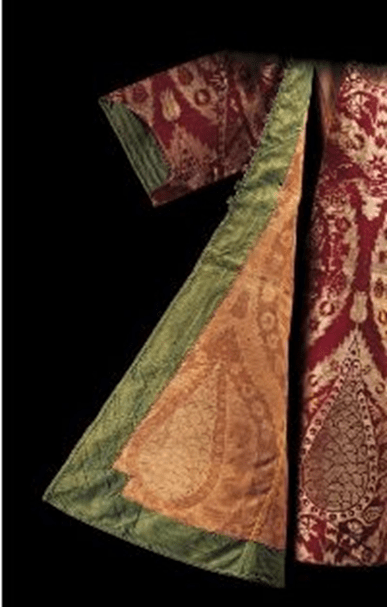
The set was made for Ayşe Sultan (1570-1605), daughter of Murad III.”
Source: Tezcan, Hu:lya. “Sixteenth and Seventeenth-Century Women’s Fashion at the Ottoman Palace,” P, Issue 3, Spring/Summer 2000. Pp. 4-17.
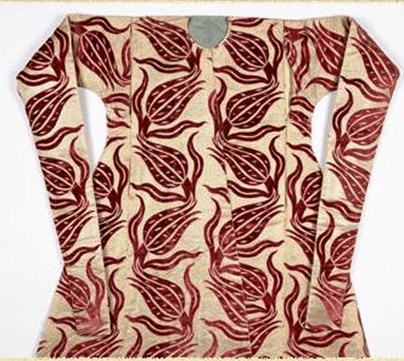
The above coat was the primary inspiration for my Turkish Ottoman coat. I was excited to find it described as having a stamped design, as I really enjoy block printing fabric!
Knowing it was block printed also made some of the inconsistencies in the fabrics pattern make more sense. (notice how the lines of dots curve at the center front, and get very close together and jumbled at the left sleeve edge)
I also appreciated that this coat was identified as having belonged to a woman, whereas as many of the extant coats we have appear to have belonged to men. It seemed wise to use a woman’s coat as my touchstone for this project, since I am focused on making a woman’s garment.
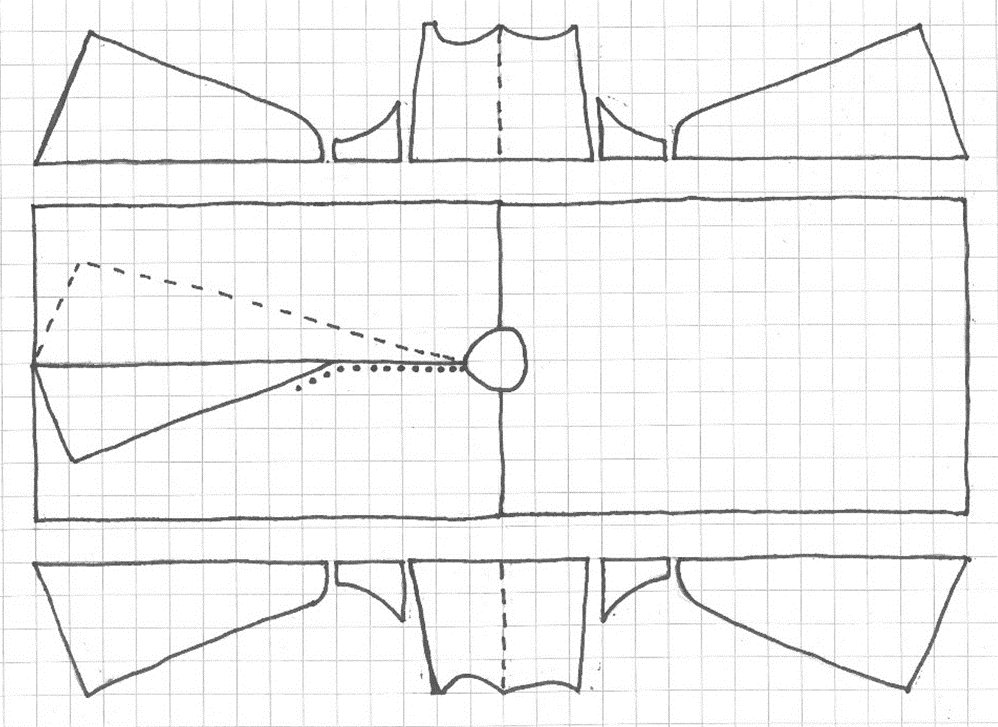
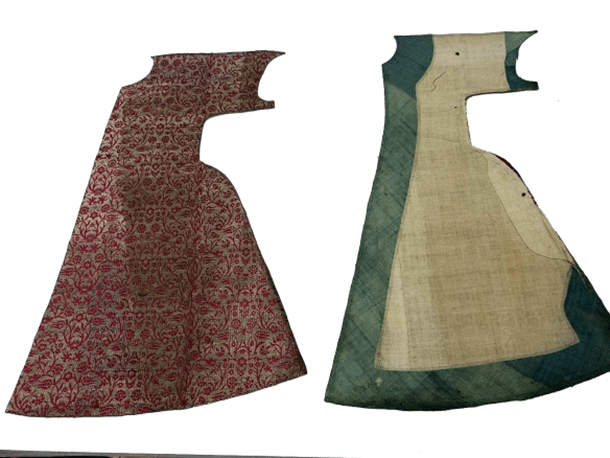
The Pattern
For the pattern, I started with the existing pattern drafted for the Turkish Venetian coat, then modified it a bit to align with what I was seeing when looking at the extant Ottoman kaftans.
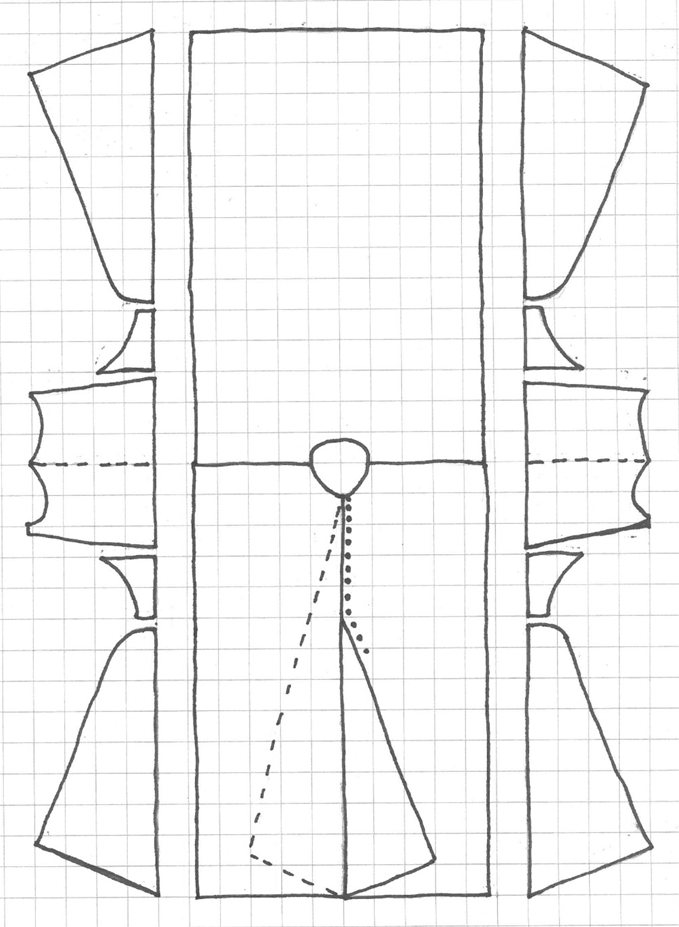
The primary changes are:
The curved cut in on the upper side gores.
The dramatic curve out at the top of the lower side gore.
The overall sleeve shape, which includes a bit of a taper from the shoulder to the elbow, and that interesting asymmetrical cut-out at the cuff,
The addition of the two overlapping front gores, with the one closest to the body going from the neckline to hem, and the outer one starting at the waist.
And a much closer fitting rounded neckline.
I have roughly indicated button placement as well.
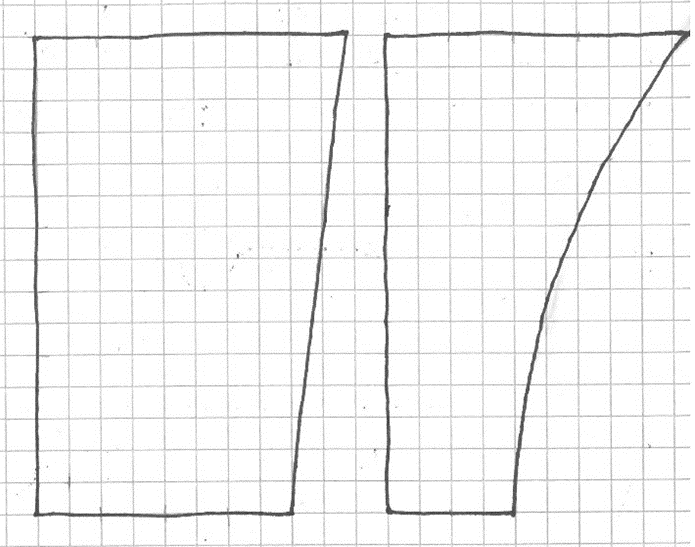
Shaping the sleeves.
(This is also my visual reminder for how I got that shape at the cuffs, because I did not think of making a pattern.)
Below is a side by side of the two coat patterns.
Fabric
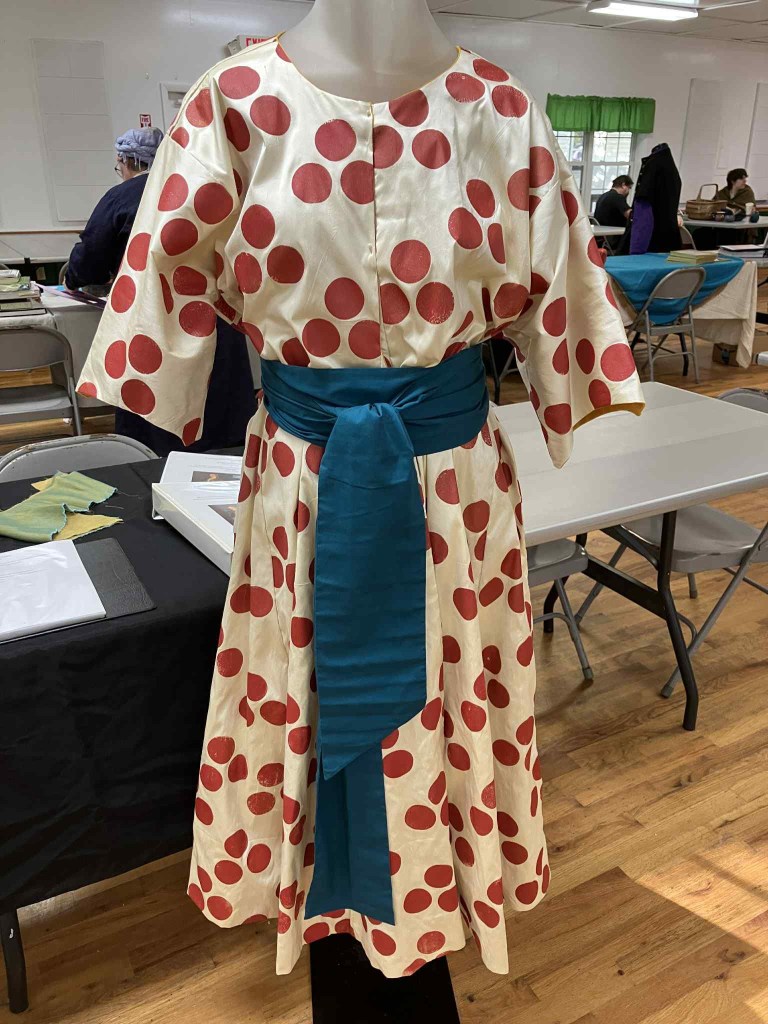
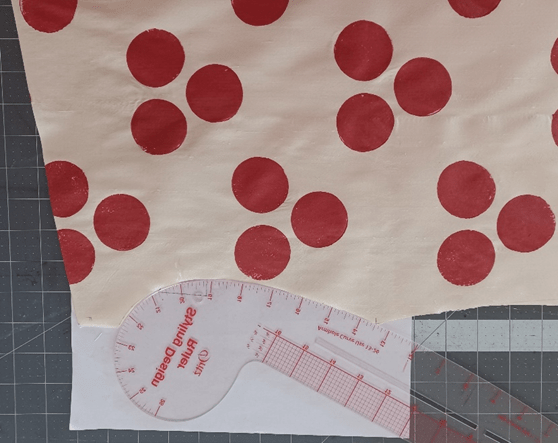
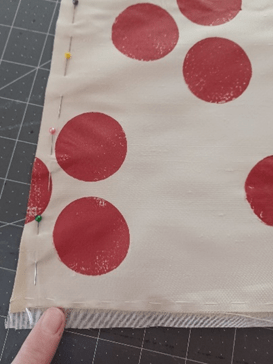
I chose a different color way than my inspo-coat, going with a white silk featuring a large scale stamped design in red.
Partly because I had a generous amount of white silk on hand, and partly because there are multiple examples of large-scale red on white designs and I loved the bold contrast!
I block printed the cintamani design onto the silk using a stamp I crafted and Speedballs oil-based block printing ink for fabrics.
The scale of my cintamani (dots) was determined when I discovered I had some pre-cut linoleum circle blanks in my stash, which meant I did not have to try and free-hand carve perfect circles!
I glued those blanks to a wood backing and called it done!
For the ink, I used a 2-1 mix of red and metallic gold.
I liked the added shimmer and depth the gold added to the red, particularly when only partially mixed.
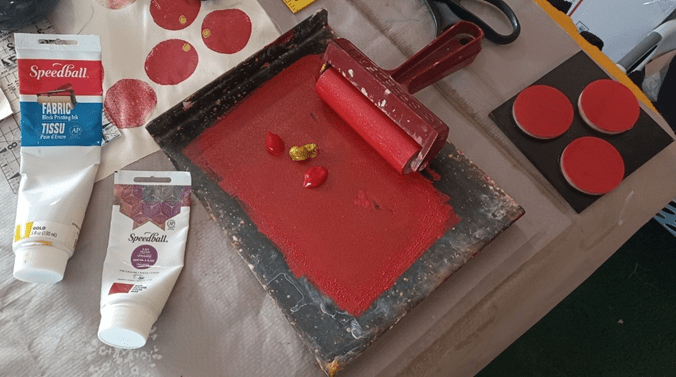
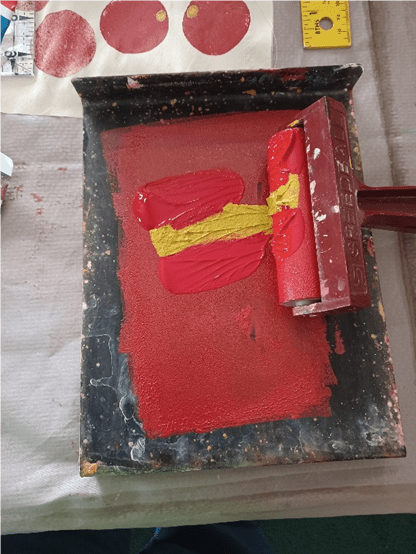
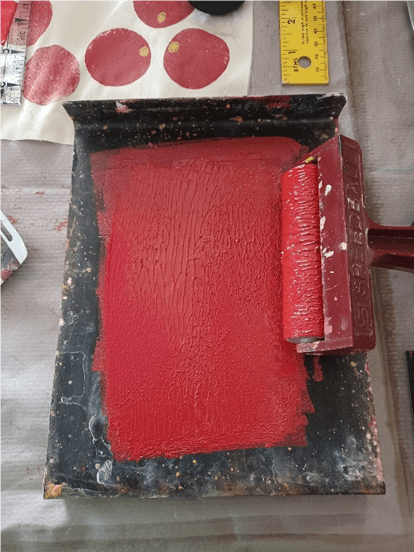
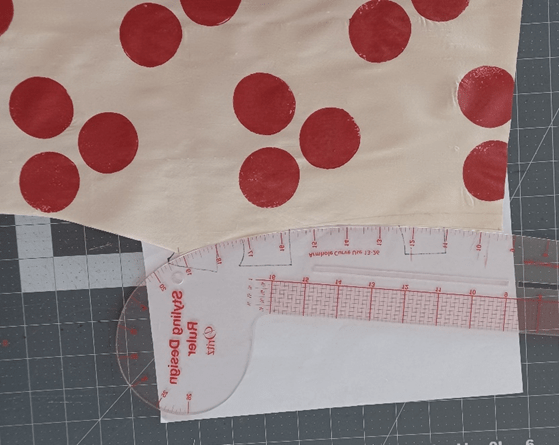
I free handed the stamp placement, stamping all the individual pattern pieces after they were cut out.
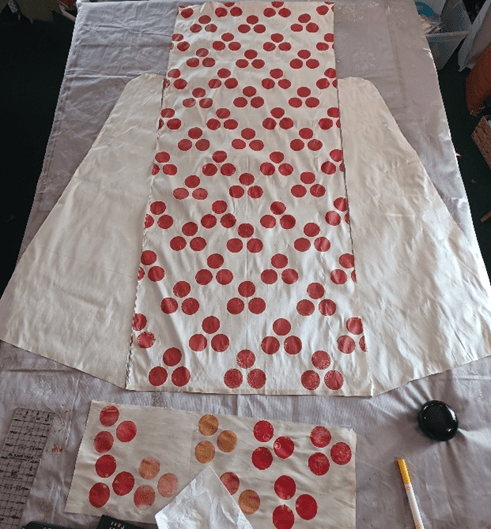
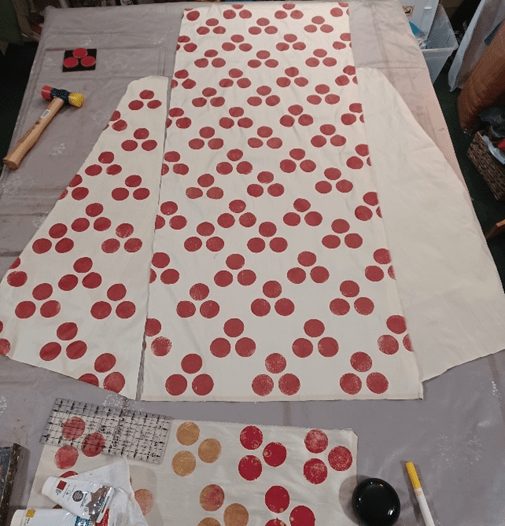
Dots and more dots…
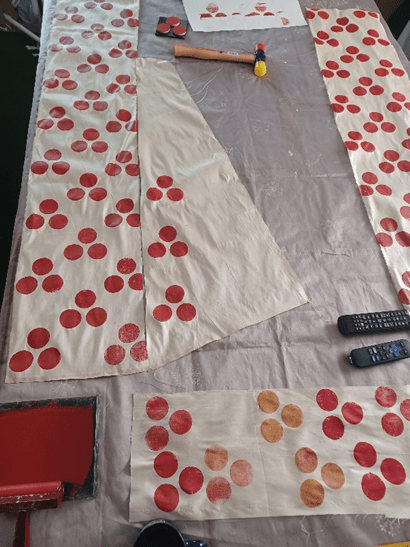
Starting to regret my pattern choice here. So. Many. Dots.
I chose to free-hand stamp because I was afraid to risk marking my white silk and then not being able to get the marks back out. Even chalk felt like a risk.
And also, I was impatient to start stamping. The original garment has a bit of wonky-ness going on its design placement, so I felt any “oopsies” made would simply be honoring the original garment and adding that authentic hand-made charm. 😉
Linings and Facings
On contemporary textile artist Molly Williams blog, Textilematters.co.uk, I found an article about several Ottoman children’s kaftans housed in the archives of The Clothworkers Centre in London, UK.
This blog included excellent pictures of the INSIDES of these coats.
These images really helped direct my lining and facing decisions for my Turkish coat.
“The lining, if any, was inserted under the facing and the free edge of the facing was turned under once and stitched into place with whip stitch.”
Textile Matters, Ottoman kaftan construction – 2 Child’s Kaftans
https://textilematters.co.uk/2017/03/26/ottoman-kaftan-construction-linings/

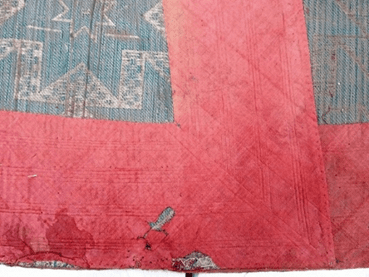
Close ups of neckline, hemline, and sleeve facings.
“Bias cut facings (12cm wide) of red/orange silk are stitched around the openings – sleeves, neck, front, and hems.” (“Ottoman kaftan construction – 2 Child’s Kaftans – MOLLY WILLIAMS”)
Textile Matters, Ottoman kaftan construction – 2 Child’s Kaftans
https://textilematters.co.uk/2017/03/26/ottoman-kaftan-construction-linings/
from the Ottoman Turkish Garment Database https://issendai.com/ottoman-turkish/ayse-sultans-blue-cintamani-kaftan/
While it does not appear that all kaftans were fully lined, I chose to fully line mine.
I felt a lining would give it a better drape, hide the show-through from the stamping, and give me something to whip stitch the facings down to so the front of the garment wouldn’t have to have stitches showing.
I chose an off-white cotton voile for the lining because it was cheap and easy to work with, and it blended perfectly with the silk. (Possibly too perfectly, as I had several recommendations to consider lining the coat when I entered it in competition!)
I lined each piece individually, basting the cotton lining onto the silk, before assembling the coat.
For the facings I used a medium weight linen in a shade of yellow that I just love. I thought the contrast with the red and white of the outside of the garment would be a lot of fun.
The original garments are noted as having wide bias cut facing.
I did not bias cut my facings because my history with making functional bias-cut tape is about 50/50, and I did not have enough of this yellow linen to risk getting it wrong.
***Note to self: Take some pictures of the lining and facings to go here***
Currently this coat has no closures. It is my intention to make small cloth buttons out of the same white silk as the coat; however I simply have not had the chance to make them yet.
Additionally, I do intend to make thread-worked loops for these buttons, as i really want them to be minimally noticeable and pretty darn small.
Conclusions
The initial question that started this project was: “Was this a real garment that was popular in Venice throughout the 1500’s, or had I found the 16th century version of Glamour Shots?”
I now feel confident that this was an actual item of clothing worn by actual women in 16th century Venice.
While most likely intended as an “around the house” garment, I do not think it is too far out of pocket to wear such a coat in a more public setting, particularly within the SCA.
And yes, I have already planned the next three Turkish Venetian coats I want to make for myself. (And my teen has also requested one!)
Next Steps
This is a project in progress, and some of my next goals include:
- Making the buttons and loops for the Turkish Ottoman coat.
- Making the correct undergarments to go with each coat.
For the Ottoman that will be a gomlek, or shirt, and some loose-fitting trousers.
For the Venetian, a generously cut camisa/chemise with beaded sleeve edges, and…?
This is where I need to do some digging. So far, I haven’t found anything to suggest what, if anything, might be worn under the camisa. I am personally leaning towards possibly a thin sleeveless shift, and also recreating the Venetian courtesan inspired calzoni (drawers) made for me years ago by a dear friend for my wedding, but before I decided for sure I want to do more research and chat with some of those scholars in the Kingdom more familiar with renaissance fashions than I am.
I am also debating, on my next Venetian coat, adjusting my sleeves to be a bit shorter. I like the length they are on me, however the more I look at the paintings I feel like my proportions are just a bit off.
Additionally, I want to make a Venetian coat out of a true silk, possibly a shot taffeta…something with a bit more body than my faux-silk ended up with after washing.
I also want to play around with some different patterns and cuts I have in mind, as well as make (at least one) that buttons all the way down the front. (sewing that many buttons is sooooo booorrring though!)
SOURCES
Fellow SCAdians blogs/class handouts:
- HL Aenor de Pessac PDF guide from her Turkish Italian Gowns sew-along:
- La Bella Donna Blog post on her Turkish Venation Gown and Coat, which led me to the Lady Aenor sew-along handout:
Turkish Venetian Gown & Coat
- Monna Laura Battista/She Who Measures
The Venetian-Turkish Coat, or, How I fell Out of my Rut.
(For some reason it won’t let me post a link to this blog, but you should be able to find it pretty easily with Google.)
- Oonaghs Own
The Humble Turkish coat: Turkish Coat For Venetian Dress
https://oonaghsown.blogspot.com/2013/04/the-humble-turkish-coat.html
- Jane Fox Historical Costumes
Women’s Clothing in 16th Century Turkey / Ottoman Empire
https://jezebeljane.blogspot.com/2015/09/womens-clothing-in-16th-century-turkey.html
- Running with Scissors, The Honorable Lady Alisandre de la Chapelle.
Part 1: A Brief Overview of Gores and Closures in Extant Kaftan (“Part I: A Brief Overview of Gores and Closures in Extant Kaftan”)
https://runningwithscissorsandfabric.blogspot.com/2020/08/part-i-brief-overview-of-gores-and.html
Non-SCAdian blogs:
Non-SCAdian blogs:
- Ottoman Turkish Garment Database
This site is full of ottoman art and extant garments. Every time I browse through its collection, I find something new and inspiring!
https://issendai.com/ottoman-turkish/
- Molly Williams Textile Matters
Ottoman Kaftan Construction-2 Child’s Kaftans
https://textilematters.co.uk/2017/03/26/ottoman-kaftan-construction-linings/
- Venice and the Islamic World
https://www.charlie-allison.com/venice-and-the-islamic-world/
Online:
- Britannica.com
- Wikipedia “Timeline of the Ottoman Empire”
- The Met Museum.org “Venice and the Ottomans
- Images of Venice.com “Silk Tarde of Venice”
- The Smithsonian National Museum of Asian Art
- Titan.org
- National Gallery of Art “Italian Painting of the Sixteenth Century: Woman Holding an Apple, c.1550” by Peter Humfrey
- English Heritage Foundation Exhibition Guide ” Titan at Apsley House”
Books:
- Juan De Alcega Tailor’s pattern Book 1589” with translation by Jean Pain and Cecilia Bainton (“Tailor’s pattern book 1589 facsimile Juan de Alcega ; with translation …”)
- Mathew Gnagys “The Modern Maker Vol.2: Pattern Manual 1580-1640”
Helpful Co-Workers:
“The Ottoman Empire was very big into furniture.” Bryan Green, Boyd County Public Library:
