“…he is no account or estimation amoungst men, if hee have not a velvet, or a taffetie Hatte, and that must be pincked and cunningly carved of the beste fashion…” (Phillip Stubbes, The Anatomie of Abuses, 1583)
Having always considered flat-caps the coolest of hats, I finally decided to look into some of the ways they were constructed in period. This is the resulting project and documentation. Originally entered in my Baronies A&S Championships as a part of a larger collection of hats and headwear of various time periods, I refined the documentation a bit and displayed just these two caps at the Æthelmearc Arts & Sciences Faire , held at Blackstone Raids in April of 2022. (The A&S Faire was a great experience and I highly recommend it to anyone!)

Name: Lady Rannveig Hraejshvelgsneys Alfvinsdottir (Renee Schmutz-Sowards)
Type of Garment: A set of two Tudor flat caps, or “bonnets”. Most strongly associated with 16th century Tudor England, but also seen throughout the 15th century as well.
Inspiration/Based on: I was inspired by similar hats seen throughout Tudor era portraits and art, as well as several extant knitted caps currently housed at the Victoria And Albert Museum and the extant caps detailed in Patterns of Fashion 3: the cut and construction of clothes for men and women c1560-1620 by Janet Arnold.
Why this project? : Probably my first sewing project ever in my SCA career was a flat cap, copied pretty much directly from a cap bought for me by my Mom at our first Pennisc. I was 14-ish, thought it was A Very Cool Hat, and decided I needed one in every color.
I have pretty much been making the same basic cap now off and on for…a lot…of years, and recently, as I looked at some fabric and thought “I could make a flat cap out of that!” it also occurred to me that maybe it was time to actually do a little research and look into the history of this style cap and how they might have been produced in period.
*I am actively working on improving and gaining more skill in my A&S documentation. As such I welcome any constructive criticism or advice on how I can improve my documentation on future projects.
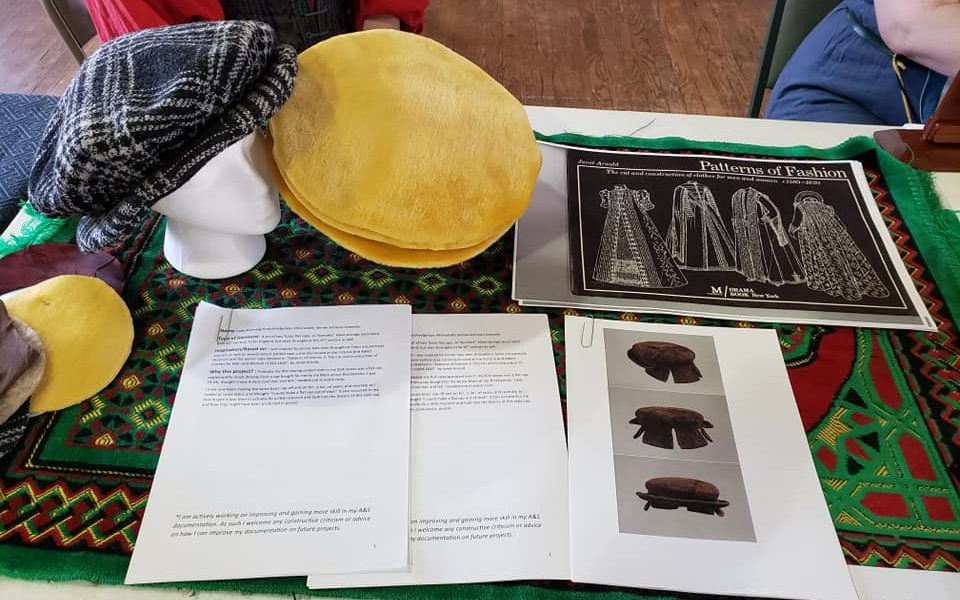

Cap 1: Yellow cap
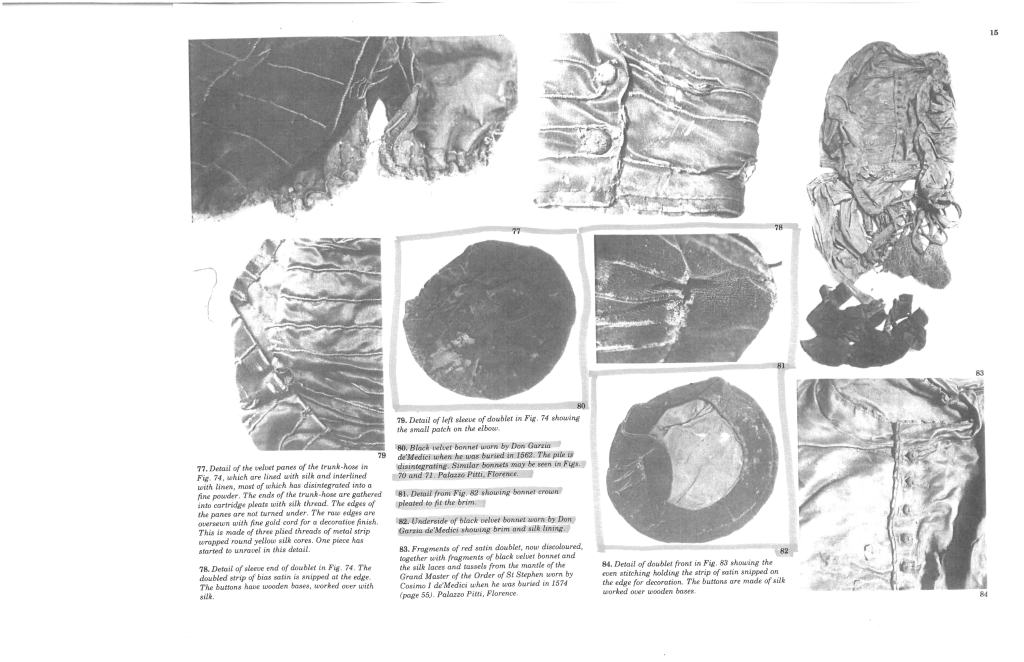
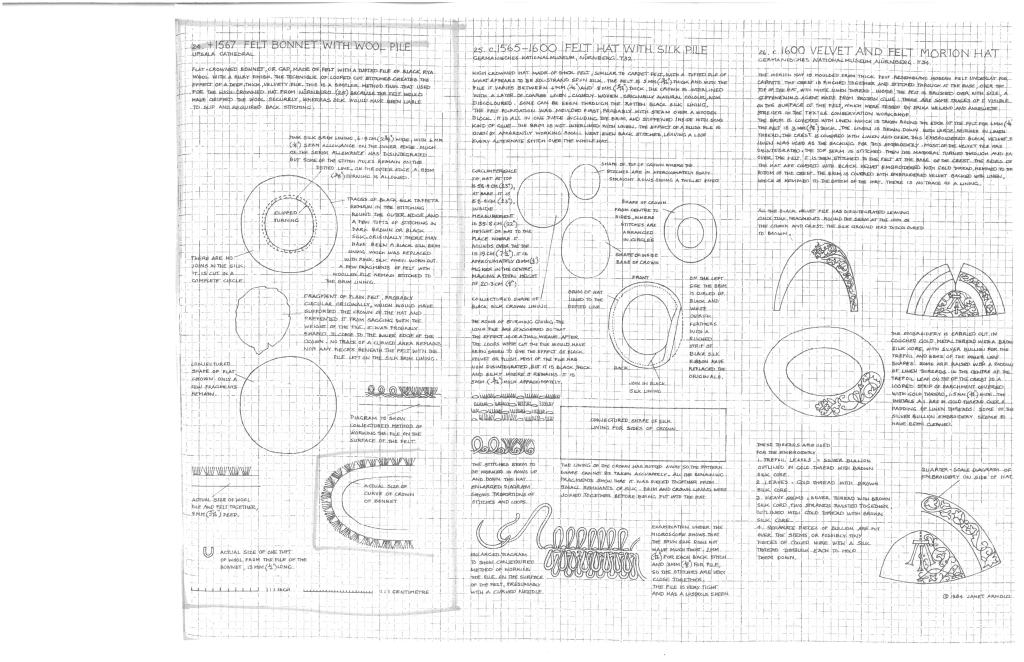
For the first cap, I decide to pretty much copy, to the best of my ability and with materials largely on hand, the first of two Tudor flat caps mention in Patterns of Fashion 3. I was intrigued by the body and thickness of this cap, compared to the relatively thin and floppy caps I had been making and wearing previously.
Materials used:
My fabric choice was a yellow low-nap faux fur type fabric. I doubt there are any natural fibers harmed in the making of this fabric, but it was something I had on hand and had plenty to experiment with, and I feel it mimics the look of the rya wool fabric used for the extant cap found in patterns of fashion. The description and look of the rya wool intrigued me, and I was eager to try a hat made out of (what I think may be) a similarly lush and substantial fabric.
In patterns of fashion 3 the author describes the brim of the hat as possibly stiffened with a pasteboard or paper that has since deteriorated. Rather than pasteboard, I chose to use Pellon Peltex 70 non-fusible interfacing. I’ve used it often to shape hats for theater productions and in modern millinery, and feel comfortable that it successfully mimics the stiffness of period available materials while also allowing my cap to stand up to the abuses of storage, packing, and travel that my SCA clothes are regularly subjected to.
The author notes that a scrap of felt sat in the crown of the cap, and surmises that it was originally a round piece that went into the crown to give it a bit more body when it sat on the head of the wearer. I had some very thick, almost furry, felted material on hand that I decided to try using. It’s much thicker than modern craft felt, and even thicker than any of the actual felted wools I have. The author seems to describe the felt used for these, and other hats in this book, as being quite thick, so I felt this was a good option.
The cap brim is lined with a burgundy poly taffeta. The original brim was lined in a pink silk taffeta that was possibly a replacement lining after the original black silk degraded. No mention is made of any sort of lining in the crown of the cap. I chose not to line the top of the crown at all. I was concerned about the thickness at the seams, since I was using a thick fabric plus a thick felt in the crown already. I also hoped that the felt would help the cap grip the head a little more when worn. I initially chose to inter-line the sides of the crown with more Peltex, but ended up cutting it out after sewing together the two crown sections, as it was just too stiff and caused the hat to sit completely flat, like a platter.
Pattern:
For this cap, I actually ended up using my existing flat cap pattern. When I compared measurements to the extant piece in PoF3 , my pattern was within an 1/8th of an inch give or take of the original, so I did not feel I needed to redraft an almost identical pattern.
Methods and techniques:
I sewed this cap entirely using machine sewing. The taffeta lining on the original brim looks like the raw edges were turned under, and then it was sewn onto the brim after the hat was completed. I chose to create a layered “sandwich’ of my outer fabric, interlining, and taffeta, right sides together, and then stich and turn right side out. It is a method I am very comfortable with and I was on a bit of a time crunch, so if I could use modern machine sewing methods to speed up the make, that’s what I did.
The inside opening of this cap is currently unfinished. I realized after sewing and trimming, the opening was actually a bit too small to fit my head the way I prefer. Since this pattern is one I have used often before, and it is usually a perfect fit, I think the issue is actually caused by the rigidity and lack of give of the Peltex I used in the brim. For this cap my plan is to take apparat the brim and crown section, trim the opening bigger, and probably finish the edges of the two sections completely, and then hand stich the sections back together.
Final thoughts:
- It was not clear if the diagram and measurements for the pleated cap in Pattern of Fashion 3 included seam allowance, so I went ahead and added seam allowance when I cut out the fabric. I think, looking at the finished cap this may have resulted in the cap being slightly bigger overall than it should be, and of the proportions between the brim and crown being not quite correct. Next time I think I will try not adding any seam allowance and cutting straight from the diagram.
- As much as I enjoy working with Peltex 70 for many types of hats, I do not think it was the right choice for the yellow cap. I think it is just too stiff and rigid. I found it took a lot of manipulation and steaming to get the yellow cap into a shape I was happy with and that looked like hats of that era. I think in the future I would like to experiment with different types of felts and stabilizers, or possibly a linen/horsehair blend. Or perhaps even a rag-type paper.
- I think if I were to make this cap again, I would attach the brim lining in the manor it looks like they did on the original, instead of the stich and flip method. I ended up with quite a thick seam at the outside edge of the brim, and it took some work to get it to turn nicely. I think I would have been better served hand stitching on the taffeta lining after the cap had been assembled and raw edges turned in.
- Overall, I am not displeased with this cap. I learned a lot that I can put toward future projects. I do love the yellow faux fur material. I can’t say for sure if it mimics rya wool well or not, but I had a lot of fun using it for this project, and with a few tweaks, I think I will enjoy wearing this cap quite a bit.
Cap 2: Knitted cap
The second cap is a bit of a hybrid, drawing inspiration from two sources. While doing some of my initial research, I came across quite a few extant knitted caps, and was particularly taken with remarkable well split brim version at the V&A (see image A). I don’t knit, but I did have another odd remnant of a wool knit fabric, so I decided to see if I could mimic the look of a knit cap with that fabric.
Since the originals knitted caps were (I assume…like I said, I am *not* a knitter) were knitted to the shape of the hat, and I was working with knitted flat yardage, I had to find a way to cut and sew the fabric that would still give the look of the softly rounded knitted caps that I admired. After considering a few options, I ultimately went with the other flat cap found in patterns of fashion. This cap feature one large circle cut for the crown and shaped with 39 small darts around the outside edge to create the crown shape, instead of the two piece donut+circle combination that makes up the crown of the first cap.
Materials used:
My inspiration fabric for this cap was a kitten wool vest I had that had developed some holes, and I wanted to re-use somehow.
Instead of using Pellon to give body to the brim, I chose to use the same thick furry felt I used in the crown of the first hat. I hope it would add to the softly rounded knitted shape I was trying to achieve. The brim is made up of a sandwich of wool knit + felt + wool knit.
The crown in the original cap is lined with a silk taffeta. Unfortunately the author does not mention how this lining might have been attached or shaped. After considering several options I chose to simply dart the lining fabric the same as I had the outer fabric, baste the two layers together around the opening and treat it as one piece from then on. For the lining I chose a brown poly blend with a body similar to taffeta.
Pattern:
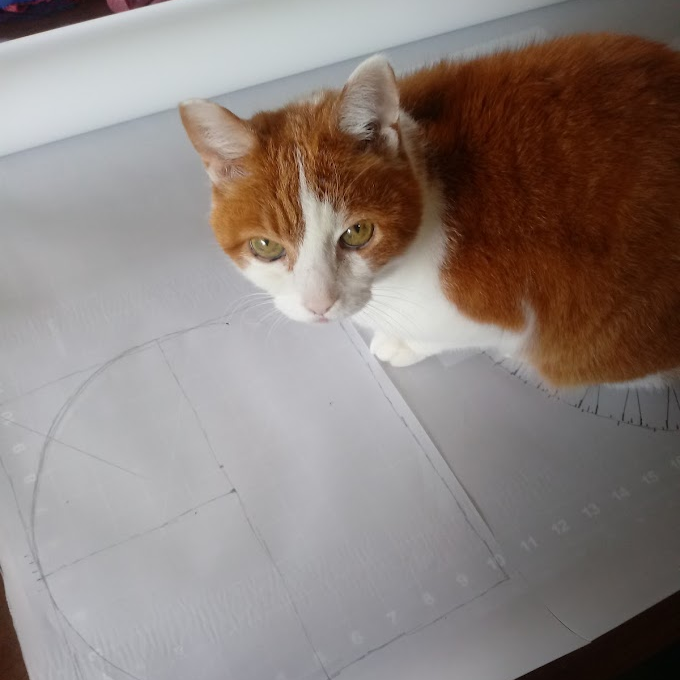
For this cap, I scaled up the pattern directly from the gridded pattern and measurements provided by Janet Arnold in PoF3. It was remarkably easy to scale, even with the assistance of my feline assistant. (*pictures of assistant included for gratuitous cat-tax) The only real tweak I made to the pattern is that the original has “39 evenly spaced dart tucks” shaping the crown. Mine ended up with 40, because it was easier to draft out an even number and my cat is really bad at counting.


Methods and techniques:
Probably the most tedious part of this cap was marking and sewing 80 tiny darts. None of the chalk I had would mark well on the knitted fabric, so I ended up painting in the dart lines using acrylic paint and a very tiny brush. I then stitched all the darts on my machines.
Once the darts were finished, assembling the rest of the cap was very simple and straight forward. The cap is almost entirely machine sewn, save for some hand done whip-stitching around the inside opening. I had originally intended to fold over the fabric to neatly cover the raw edge of the opening, but my fabrics were so thick there was no way I could do that without distorting the whole shape of the cap. Instead, I tacked the layers together with a quick and dirty whip- stitch.
I copied this pattern from the extant piece, and the opening should be about same size as the original would have been. Unfortunately this is a bit too big for my head. Since I want to do a better finish on the opening anyway, I think in the future I may stich some thick cording down to both, finish the edge neatly, and to decrease the size of the opening slightly.
Final thoughts:
- Next I would like to experiment with the split brim seen on one of the knit caps and on the Portrait of a Man in a Red Cap in my examples.
- I think I would have been better served had I fully finished the edges of the center openings of the brim and crown sections, and then whip stitching the finished sections together. I think this would give me a much neater finish. Unfortunately this only occurred to me after I finished assembling both caps and was struggling with how to neatly finish off the now very bulky edges.
- I am overall very pleased with the shape and softness of this cap. I can absolutely see myself using this pleated crown method on future projects and I love how the thick felted material works as a stabilizer/interlining. I think I need to track down more of this type of felt!
Images and Source Material
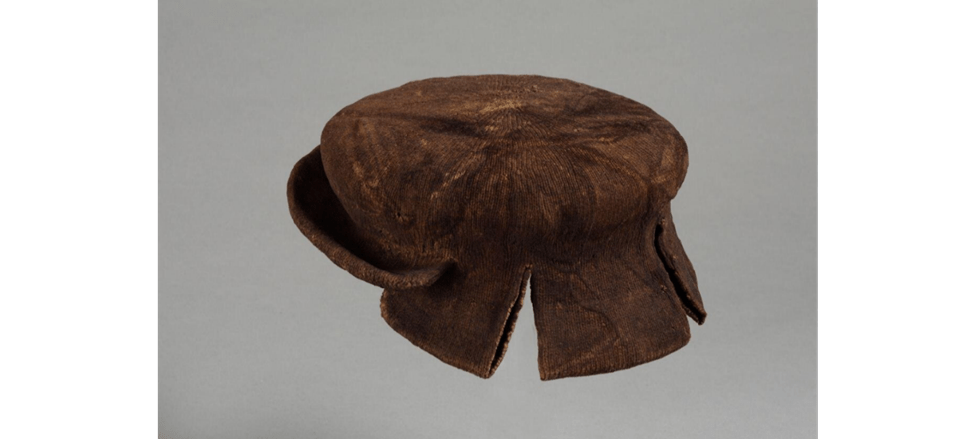
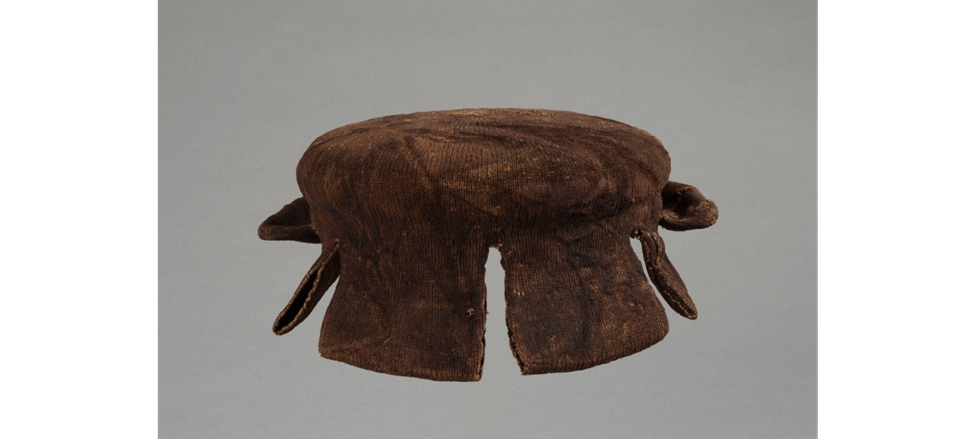

Knitted Cap, ca. 1500-1550 from London
- Currently part of the Victoria and Albert Museum collection and available to view online at http://collections.vam.ac.uk/item/O124669/cap-unknown/
“This cap of closely knitted wool was probably originally black. The crown is flat and knitted to shape. The brim is deeper at the back than the front, and is cut so as to form four lappets (‘ears’). These have a raw edge, ie they have not been finished off with stitching or hemming. The cap probably had a felted finish which it has lost. Typically, knitting ladders when the wool is broken, but here it has not.
Knitted or felted caps were designed to be warm and waterproof. Some protected the neck, some had ear flaps, and many were trimmed with ribbons to imitate expensive silk versions. Wealthy Londoners would have worn European fashionable bonnets or caps of silk velvet decorated with ostrich feathers, aglets (jewelled pins) and brooches. Knitted caps were heavily felted so their surface texture imitated velvet. Wool absorbs colour easily, so many caps were dyed in strong colours, such as red and black, which were fashionable at the time.
A large number of 16th-century knitted caps, most of highly fashionable shape, were discovered in Greater London in the early 20th century during building works. The context of the finds and the fact that the caps themselves were knitted suggest that they were not intended for the upper strata of society, but rather for the middle classes.”
PHYSICAL DESCRIPTION
”Cap of closely knitted wool, now purplish-brown in colour but probably originally black. The crown is flat and knitted to shape with a brim all round; the brim is deeper at the back than the front, and is cut so as to form four lappets. These lappets have a raw edge, they have been cut but not finished off with stitching or hemming. The cap probably had a felted finish which it has lost.”
DIMENSIONS
- Height: 12.5cm
- Diameter: 25cm
- Weight: 0.1kg


| Man’s or woman’s knitted wool cap, 1500-50, English, red, split brim style. Currently part of the Victoria and Albert Museum collection and available to view online at https://collections.vam.ac.uk/item/O119614/cap-unknown/ | |
| PHYSICAL DESCRIPTION | “Cap for a man or woman of wool yarn, handknit in the round and then fulled, in the split-brim style. It has a single layer brim, in reverse stocking stitch; the crown is knit in stocking stitch. Some of the cap’s original red colour (possibly dyed with madder) remains. The remains of strings are attached on each side, and were probably to be tied together over the top of the crown.” |
| DIMENSIONS | Diameter: 25cmWeight: 0.1kg Measured for the Medieval and Renaissance Galleries |
| STYLE | Tudor |
| HISTORICAL CONTEXT | “This cap is fairly small, and, as a result, it has always been assumed that it belonged to a boy. Evidence from drawings of the 1530s by Hans Holbein the Younger (1497/8-1543) suggest that this assumption may not necessarily be accurate. In these drawings the rounded caps worn by adult men are relatively small, worn off centre, on the side of the head rather than resting on top of the head. Nonetheless, the head for which this cap was intended was not large. An alternative explanation of its size is the possibility that it might have shrunk over the hundreds of years of its existence. There is however no obvious sign of shrinkage. Knitted or felted caps were designed to be warm and waterproof, some protected the neck, some had ear flaps and many were trimmed with ribbons to imitate expensive silk versions. Wealthy Londoners would have worn European fashionable bonnets / caps of silk velvet decorated with ostrich feathers, aglets and brooches. Knitted caps were heavily felted so that their surface texture imitated velvet. Wool absorbs colour easily, so many caps were dyed in strong colours, such as red and black which were fashionable at the time. A large number of 16th-century knitted caps, most of highly fashionable shape, have been discovered in Greater London in the early 20th century during building works. The context/location of the find and the fact that the caps themselves were knitted suggest that they were not intended for the upper strata of society, but rather for the middle classes.” |

Sir Thomas Gresham (1519-1579)
circa 1560 (1555-1565)
By Antonis Mor (1519-1575)
Alternative title(s):
Portrait of Sir Thomas Gresham (1519 – 1579) Merchant and financial agent of the English crown in the Netherlands, founder of the Royal Exchange and of Gresham College, London
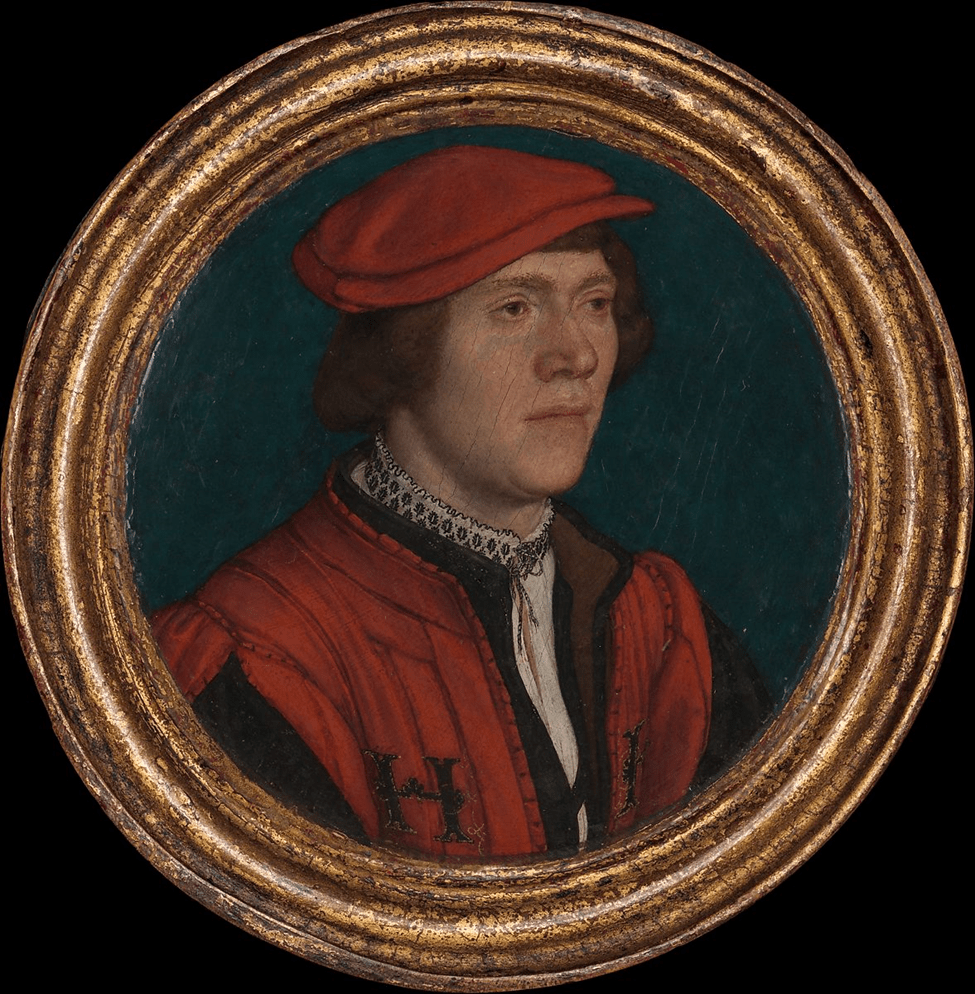
Portrait of a Man in a Red Cap1532–35
By Hans Holbein the Younger German
On view at The Met Fifth Avenue in Gallery 626

Man in Red
German/Netherlandish School, c. 1530-1550,
Royal Collection, London.